 "NaturallyAspirated" (NaturallyAspirated)
10/13/2013 at 20:28 ē Filed to: Howto, oppo tools
 5
5
 10
10
 "NaturallyAspirated" (NaturallyAspirated)
10/13/2013 at 20:28 ē Filed to: Howto, oppo tools |  5 5
|  10 10 |
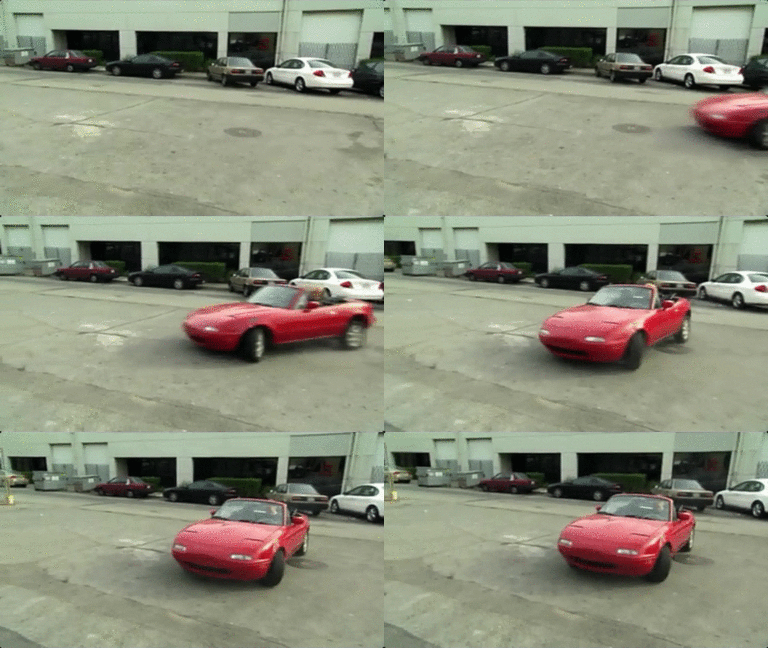
I've seen a number of posts (and even started one myself) here on Oppo asking how to make the animated GIFs that we all enjoy so much. Invariably, the answers usually consist of:
Use Photoshop
Use The GIMP
Use this website that puts watermarks on everything
"Use Photoshop" doesn't work for me, since I don't own a legal license, won't purchase a legal license because I donít need it (Paint.NET does everything I need to do for free), and won't pirate it. "Use The GIMP" doesn't work because The GIMP has one of the worst UIs in the history of computers, and trying to figure out how to use it is like pulling teeth. "Use this website" doesn't work because I hate watermarks, and because I want more control over how the animations look and work.
As it turns out, there is an another way to make animated GIFs using only free and open source software.
For this guide, I am assuming you are using Windows. As far as I know, Mac OSX and Linux should be similar, since all the software we are using is multi-platform. I dunno though, my last Mac ran OS9, and all my Linux boxen are headless servers.
Be forewarned, this method does require the use of the command line.
The software that you will need for this method is:
!!!error: Indecipherable SUB-paragraph formatting!!! (Note: This is included with ImageMagick, so you don't need to download it separately. I am including it here only for completeness.)
Go ahead and download those and get them set up.
Ready? Great. The first thing you need is a source video file that you want to turn into an animated GIF. If you already have this as a video file, great, skip to step 2. If you need to capture the video from a computer program, such as a game or other source, let's get started!
For the purposes of this tutorial, I'm using a ~5 second clip from Mythbusters Collection 7, Episode 9, which you should totally watch if you haven't seen it. I believe my use of this clip constitutes !!!error: Indecipherable SUB-paragraph formatting!!! under US Title 17, as "reproduction by a teacher of a small part of a work to illustrate a lesson."
1. Capture your source into a video file using VLC Media Player.
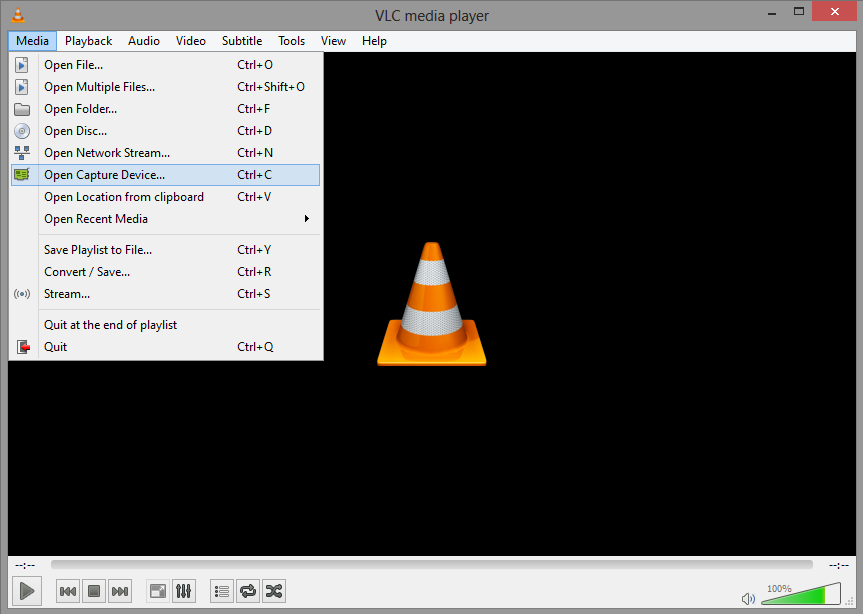
1.1. Open VLC Media Player, go to the Media menu, and select Open Capture Device.
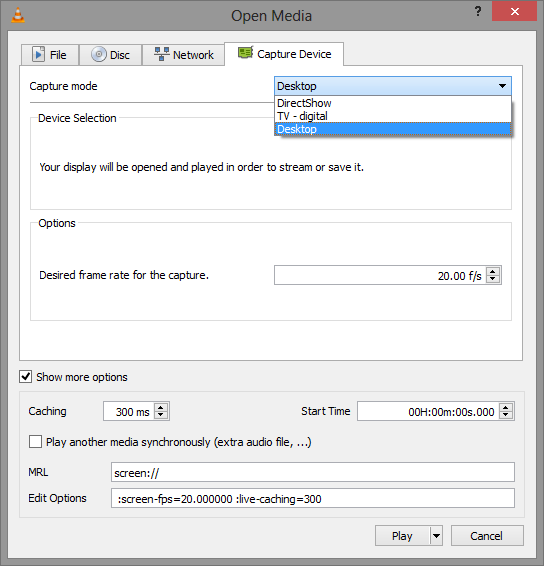
1.2. In the dialog box that comes up, select "Desktop" from the "Capture Mode" drop-down, and make sure to set the "Desired frame rate for the capture" to 60, as I have had issues with choppy GIFs with lower values.
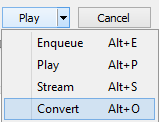
1.3. Notice next to the "Play" button at the bottom, there is a little down arrow. Click this arrow, then select "Convert" from the menu.
1.4. In the "Convert" dialog, the default options should all be OK. Just click "Browse" to set the output file name for the capture.
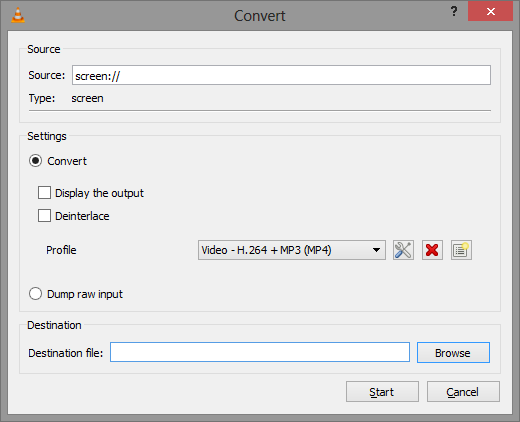
1.5. When you click the "Start" button at the bottom of this dialog, the video capture will start immediately, so make sure whatever you want to capture is ready to go. Go ahead and click Start, then switch to whatever you want to capture. Make it full screen if possible.
1.6. Once you have finished, switch to the VLC Media Player window and press the "Stop" button (the same one you would click to stop a video that was playing). At this point, the filename you specified for the "Destination file" in step 1.4 should contain a video of what you just did on your computer. Play it back to make sure.
2. Find rough start and stop points in your source video for your animated GIF.
2.1. Even though the clip Iím trying to use is less than 5 seconds long, I ended up capturing almost a full minute of me fooling around on my PC trying to get the video full screen. The first step to trimming this down is to find roughly the start and end times for the clip that I want. Do this by first opening the captured video file in VLC Media Player.
2.2. Play the video, and note the time in the bottom left of the window at the point you want your clip to start.
2.3. Also note the time at the point you want your clip to end, and figure out the difference between your start and stop times. For example, if your start time is 16 seconds and your end time is 21 seconds, the difference is 5 seconds.
3. Take your source video apart and turn each frame into a separate jpeg.
3.1. This is where the command-line stuff begins. In Windows Explorer, hold Ctrl+Shift and right-click on the folder where your source video is located. From the menu, select "Open Command Window Here."
3.2. We will use the FFMPEG tool to extract each frame of your source video into a separate jpeg image. The basic command you will want to use is:
ffmpeg -ss
In my case, my source filename was MiataSlide.mp4, the rough start point for the animation I was trying to make was at 16 seconds, and I needed to capture 5 seconds to make sure I got the full sequence. So my command line looked like this: ffmpeg -ss 16 -i MiataSlide.mp4 -t 5 image-%5d.jpg
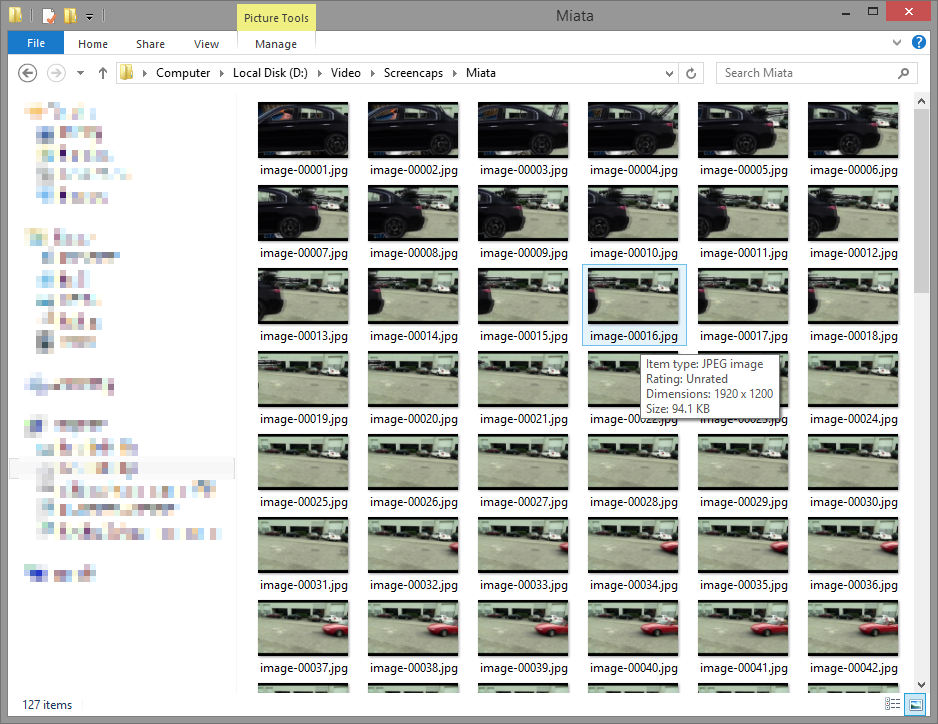
3.3. Once you hit "enter" on this command, FFMPEG will fill your current folder with a bunch of .jpg images, one for each frame.
4. "Edit" your animated GIF with the Delete key.
4.1. Now the fun part - look through the jpgs and delete any of them that you don't want in your animation.
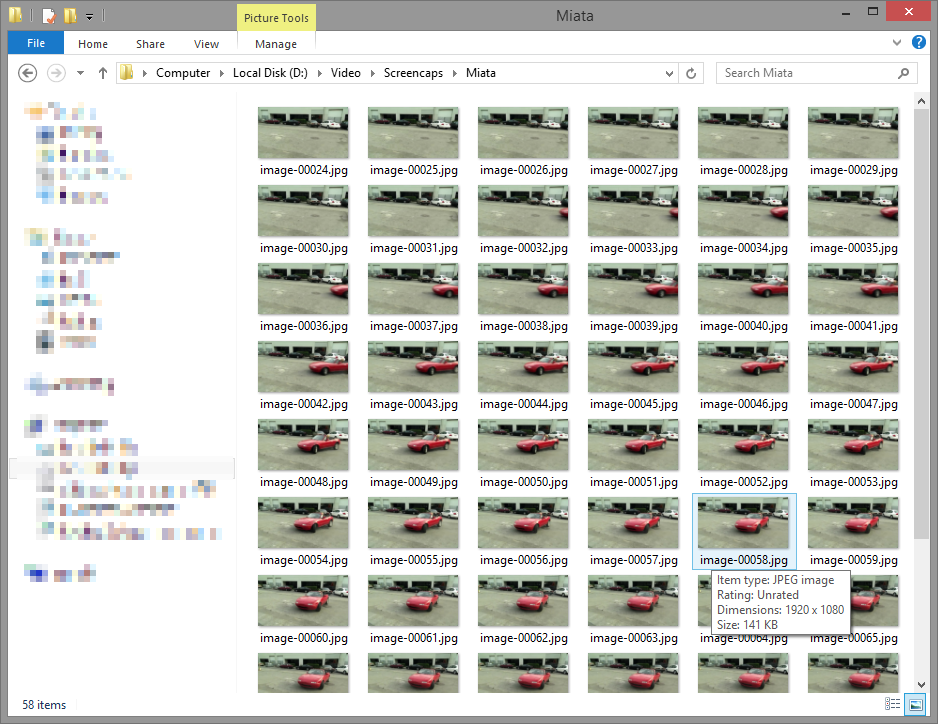
In my case, at the start of the images, I had part of the previous scene transition with the black car driving across the screen. I looked at the first couple of files and deleted all of the images that had the black car in them. image-00024.jpg was the first image that didn't have any of the black car in it.
The last few images had the start of the next scene, so I deleted those as well.
5. Edit the pictures if necessary - optional.
5.1. In my case, each of the frames had black bars at the top and bottom of the image. This is because the source video was at 1920x1080, while my monitor is actually 1920x1200. To remove the black bars, Iím going to use the tool "mogrify" that is a part of the ImageMagick package.
5.2. The command line that I used was: mogrify -gravity Center -crop 100x90% *.jpg
-gravity Center specifies that I want the cropping done relative to the center of each image, in order to remove an equal amount from both the top and bottom of each image.
-crop 100x90% means keep 100% of the width and 90% of the height of each image. I used 90% because 1080 is 90% of 1200.
*.jpg tells mogrify to apply these edits to all .jpg files in the current folder. Thatís looking much better.
6. Turn the series of jpg images into an animated GIF.
6.1. For this, we will turn to the "convert" tool, another part of ImageMagick. The basic command-line format for convert is something like this:
6.2. convert -delay 3 -layers optimize -fuzz 1% -resize 20% *.jpg output.gif
-delay 3 tells convert that each frame should be shown for 3 milliseconds. By playing with this number, you can adjust the speed at which the animated GIF plays back.
-layers optimize tells convert to optimize the GIF for file size using both frame optimization and transparency optimization. This shouldn't have any effect on the quality of the output image, but it will have a large effect on file size.
-fuzz 1% tells convert to further optimize the GIF for file size. Specifically, it tells convert to ignore a pixel's color change if the new color is within 1% of the old color. The higher the percentage, the smaller the file but the worse the quality. You should experiment with this and see what works best for you.
-resize 20% tells convert that the final GIF file should be 20% of the resolution of each of the .jpgs. I picked 20% kind of arbitrarily, since I knew I didn't want a 1920x1080 GIF file, and 20% of that size is pretty close to the standard QVGA size of 320x240.
*.jpg tells convert to grab all of the .jpg files in the current folder and use them for the animation. Convert will put these files in alphabetical and numeric order.
output.gif is the filename of the output file convert will create.
6.3. I got the GIF posted at the top of the article from the convert tool at this point.
I know thereís a lot of steps here, but hopefully you've been able to grasp what I'm trying to explain. If you have questions let me know and I will try to answer them if I am able.
 Tom McParland
> NaturallyAspirated
10/13/2013 at 20:39 |
|
Thanks for this great info! Would you mind adding the "oppo tools" tag to your post? That is where all our cool/helpful stuff goes. Well done on keeping Oppo awesome!
 Blunion05 drives a pink S2000 (USER WAS BANNED FOR THIS POST)
> NaturallyAspirated
10/13/2013 at 20:54 |
|
So how long does it really take to do all this?
 NaturallyAspirated
> Tom McParland
10/13/2013 at 21:11 |
|
Will do, and thanks!
 NaturallyAspirated
> Blunion05 drives a pink S2000 (USER WAS BANNED FOR THIS POST)
10/13/2013 at 21:12 |
|
Just a minute or two, really, if you already have your source material ready.
 Blunion05 drives a pink S2000 (USER WAS BANNED FOR THIS POST)
> NaturallyAspirated
10/13/2013 at 21:21 |
|
I figured it didn't really take as long as this post makes it seem.
 Victorious Secret
> NaturallyAspirated
10/13/2013 at 21:24 |
|
Yea, tag this as Oppo tools and either I, someone else, or even you if you can, can amend the guide for Mac users as well.
Dis gon be GOOD.
 NaturallyAspirated
> Victorious Secret
10/13/2013 at 21:28 |
|
I went ahead and added the Oppo tools tag. As I said in the post, my last Mac ran OS9 so I'm not really up on how this would work on a modern Mac.
 Victorious Secret
> NaturallyAspirated
10/13/2013 at 21:28 |
|
I'll go ahead and give this a try on Mac when I'm home, hopefully its just more of the same.
 Turner950
> NaturallyAspirated
10/14/2013 at 17:22 |
|
I spent a few bucks on gifbrewery on the mac app store. Converting videos to gifs can take less than 10 seconds if you know what you're doing.
 videoatclick
> NaturallyAspirated
05/17/2017 at 01:18 |
|
Thanks for the great and detail cut the method of getting frames from vlc is awesome and I have familiar with photoshop cause I have using it for animated video production .